Prescrypto Tutorial
This page explains how developers can get started using Prescrypto APIs.
If you are using Prescrypto APIs for the first time, you can follow the steps in this guide to call the APIs using curl commands. You can use curl commands to experiment with an API before you develop your application.
Creating the main Models
Below we can see the main models to start using the API. Hospitals, and Medics.
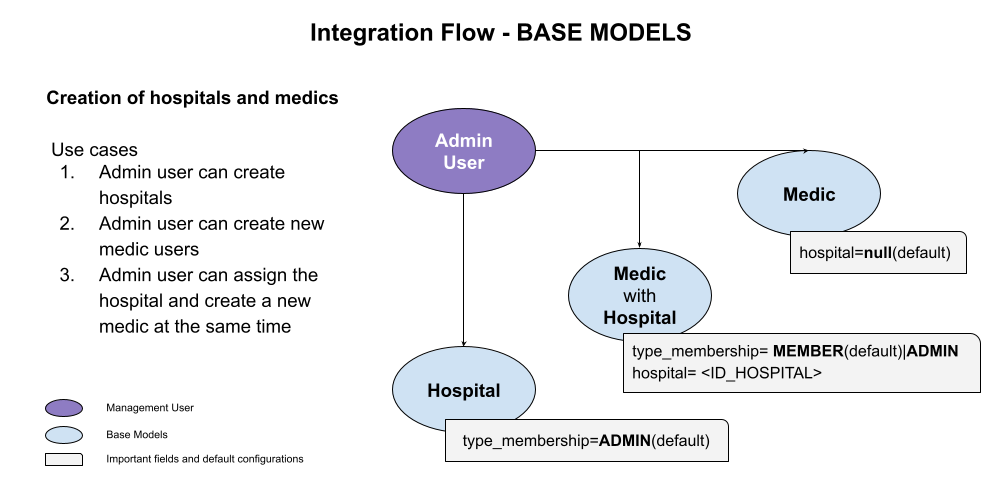
Creating a Hospital
First, we recommend you create a place to work. So the endpoint hospital will be the first to hint!
Example Request
curl --request POST \
  --url <BASE>/api/v2/hospital/ \
  --header 'Authorization: Token <TOKEN>' \
  --header 'Content-Type: application/json' \
  --data '{
      "name": "Test Hospital(Short name)",
      // PRINTED FIELDS
      "patron": "TEST HOSPITAL",
      "headline": "Slogan",
      "location": "My address",
      "contact": "2384094571, 557658394 hola@gmail.com",
      // Optional fields
      "page_size": 0, // DEFAULT LETTER '0', HALF PAGE '1'
      "info": false // DEFAULT false, whether shows extra info or not in the prescription pdf
}'
Response
{
  "id": 9<HOSPITAL_ID>,
  "created_at": "2021-07-21T23:00:30.278678Z",
  "name": "Test Hospital",
  "patron": "TEST HOSPITAL",
  "headline": "Slogan",
  "location": "My address",
  "contact": "5551111222, hola@gmail.com"
  "page_size": 0,
  "picture": null,
  "university_logo": null,
  "is_active": true,
  "is_admin": true,
  "info": false
}
The pictures could be uploaded by using the web form on the plataform or by postman forms alike. There's an example in our postman collection
Also what the default configurations means, these fields affect the medic workflow alongside Prescrypto platform.
Creating Medics
Once the HOSPITAL has been created, we can proceed to create new medic users. Let's create two medics, one with the hospital recently created and the other without hospital
So we will use the endpoint medics
Example Request
curl --request POST \
  --url <BASE>/api/v2/medics/ \
  --header 'Authorization: Token <TOKEN>' \
  --header 'Content-Type: application/json' \
  --data '{
    "name": "Test Doctor Who",
    "password": "SomeRandomPASS",
    "email": "testemailing@email.com",
    "date_of_birth": "1991-09-03",
    "cedula_prof": "ABC1234",
    "specialty_no": "ABC12345",
    "specialty": "Oftalmólogo",
    "alma_mater": "Testing University",
    "female": false,
    "specialty_verified": true,
    "hospital": 9,
    // Optional fields
    "is_active": true, // Default true
    "is_admin_membership": true // Default false
}'
If the field is settled TRUE, the medic user can edit the hospital or invite new members to it, otherwise, the medic will be only a member, who can create prescriptions from that location or remove their own membership. There is more information in the membership section
Response
{
  "id": 3253,
  "token": "ee8c126TEST",
  "name": "Test Doctor Who",
  "password": "pbkdf2_sha256$150000$seSHVhCcpeF0$Lt7E9e9hpXYg5iG4Z7nGa5YWTb6LIjRzP8FIkiskWT0=",
  "email": "testemailing@email.com",
  "hospital": 9,
  "date_of_birth": "1991-09-03",
  "cedula_prof": "ABC1234",
  "specialty_no": "ABC1234",
  "specialty": "Oftalmólogo",
  "alma_mater": "Testing University",
  "female": false,
  "is_active": true,
  "specialty_verified": true,
  "campaign": null,
  "is_admin_membership": false
}
In order to have a better integration, we highly recommend you to save the id and the token fields after created medic users.
token fieldThe token field is only showed on create response POST "api/v2/medics"
We verify the metadata of every medic on our plataform, if the medic has not specialty verified, shamely that medic couldn't create any prescription. Please let us know if your integrations have or haven't got specialty verified users
Creating Prescriptions
The next step is to create the first prescription
Regarding the before steps, we have the following data:
| LABEL | value |
|---|---|
| HOSPITAL_ID | 9 |
| MEDIC_ID | 3253 |
| MEDIC_TOKEN | ee8c126TEST |
Creating a Patient
Attention. From now on the
medic's tokenwill be used instead of theadmin's
You can see the patient endpoint as well, in order to have more details about patient model. Before creating a prescription, the patient ID is required, you have to create or search for the patient, as follows:
Search patient
// "search_word" could be email or name

curl --location
  --request GET '<BASE>/api/v2/patient/?search=<SEARCH_WORD>' \
  --header 'Authorization: Token <MEDIC_TOKEN>'
Response
[
    {
        "id": 180,
        "name": "Juan Alvarado",
        "email": "testPatient@email.com",
        "date_of_birth": "1990-01-18",
        "external_patient_file": "",
        "gender": "M",
        "curp": "ABCTEST",
        "phone": "555123456",
        "address": "",
        "state": "",
        "zip_code": "",
        "location": "CDMX, Ciudad de México",
        "uid": "da59b2a8-5473-4b6c-b67e-06b07b6602e7". // <PATIENT_ID>
    }
]
So the important field is uid. Save it.
Adding Medications
The medication object has a lot of useful fields, but in this tutorial only we take care of the needed in order to create a prescription.
Example of a simple medication
{
    "presentation": "Spiolto Respimat Solución Cartucho de 4ML 30 Dosis Caja (tiotropio 0.226 mg, clorhidrato de olodaterol 0.226 mg)",
    "instructions": "Una vez cada 8 horas",
    "qty": 3,
    "drug_upc": "0b7949396af3a5c03d68f22b267b0d85f5175b23f8533ad1ff261c0d5bd5191e",
    "category": "standard_drug"
}
Notice that the field drug_upc and category are special. See the following table to know how to fullfil those fields.
| Whether you have this field | MUST | Optional |
|---|---|---|
drug_upc: "from your catalog" | category: "basic_drug" | - |
drug_upc: "from our catalog" | category: "from our catalog category" We send you the correct category for the product | category: "basic_drug" Could be basic_drug if it belong to your catalog too |
drug_upc: "" | - | - |
See the products endpoint to see more details about how to find medications from our catalog
Create prescription
Now the process of create a prescription is as follow:
First we have to create the payload adding the before values:
curl --location --request POST '<BASE>/api/v2/rx-endpoint/' \
--header 'Authorization: Token <MEDIC_TOKEN>' \
--header 'Content-Type: application/json' \
--data-raw '{
    "hospital": 9,  // <HOSPITAL_ID>
    "clinic": null,
    "patient": {
        "uid": "cba292ec-2a76-47d7-b746-902c9d41a9f4" // <PATIENT_UID>
    },
    "diagnosis": "Diagnostico de prueba!",
    "medications": [
        {
            "presentation": "Spiolto Respimat Solución Cartucho de 4ML 30 Dosis Caja (tiotropio 0.226 mg, clorhidrato de olodaterol 0.226 mg)",
            "instructions": "Spiolto Med",
            "qty": 1,
            "drug_upc": "0b7949396af3a5c03d68f22b267b0d85f5175b23f8533ad1ff261c0d5bd5191e",
            "category": "standard_drug"
        },
        {
            "presentation": "Prueba de Detección de SARS-CoV-2 (COVID-19)",
            "instructions": "Porfavor haga esta prueba",
            "qty": 3,
            "drug_upc": "83cd6128a7f3f50dab182b20cee7aa966a2255e77ba2d16b200f2c2d191430e4",
            "category": "standard_drug",
        }
    ],
    "extras": "Indicaciones extras para el paciente u observaciones",
    "show_diagnosis": true,
    "send_rx": true, // if set false, the rx won't sent
}'
The response is as follow:
{
  "id": 2136,
  "hospital": 9,
  "clinic": null,
  "medic": "<MEDIC_EMAIL>",
  "patient": {
    "uid": "<PATIENT_UID>",
    "name": "<PATIENT_NAME>",
    "email": "<PATIENT_EMAIL>"
  },
  "diagnosis": "Prueba para medicamentos , pharmacy",
  "medications": [
    {
      "id": 439,
      "presentation": "Prueba de Detección de SARS-CoV-2 (COVID-19)",
      "instructions": "Porfavor haga esta prueba",
      "drug": "Prueba de Deteccion de SARS-CoV-2 (COVID-19)",
      "cost": 0.0,
      "bought": false,
      "qty": 1,
      "bought_qty": 0,
      "drug_upc": "<DRUG_UPC>",
      "order_id": 0,
      "category": "standard_drug",
      "qty_label": "Sin suspender"
    },
    {
      "id": 438,
      "presentation": "Spiolto Respimat Solución Cartucho de 4ML 30 Dosis Caja (tiotropio 0.226 mg, clorhidrato de olodaterol 0.226 mg)",
      "instructions": "Spiolto Med",
      "drug": "Spiolto Respimat Solucion Cartucho de 4ML 30 Dosis Caja (tiotropio 0.226 mg, clorhidrato de olodaterol 0.226 mg)",
      "cost": 0.0,
      "bought": false,
      "qty": 3,
      "bought_qty": 0,
      "drug_upc": "0b7949396af3a5c03d68f22b267b0d85f5175b23f8533ad1ff261c0d5bd5191e",
      "order_id": 0,
      "category": "standard_drug",
      "qty_label": "A la discreción del farmacéutico(a)"
    }
  ],
  "extras": "Indicaciones extras para el paciente u observaciones",
  "signature": "c3096f28b4df5f19f04bcf39ba8cc0b81ce38068dd03a98c7eb37a8be38fdfd7", // <RX_ID>
  "created_at": "2021-08-14",
  "sent": null, // The API sent the email in async way, that means that the status will be update after some minutes
  "send_rx": true,
  "additional_data": {},
  "show_diagnosis": true,
  "rejected": false,
  "bought": false,
  "cta_link": "<BASE_URL>/r/4q" // Link that redirect the user to our patient landing, where can found an external service to get the medications
}
The important field is the signature field and the status of the rx about bought medications. So you can see details of the prescription everytime using the prescription detail endpoint
Listening webhooks
The webhooks are important in cases where you have external services who need to know when a prescription is made by one of your medics.
You must define a POST Endpoint where we can send the information. And give us the list of the medics by email or the hospitals that you manage, so whenever a medic listed before made a prescription we send a post request to your webhook endpoint.
Let's see an example: We send to a Prescrypto admin the follow information:
HOSPITAL_ID_LIST = [<HOSPITAL_ID_01>, <HOSPITAL_ID_2>]
MEDIC_ID_LIST = [<MEDIC_ID>, <MEDIC_EMAIL>]
WEBHOOOK_URL = "<MY_SITE_DOMAIN><WEBHOOK_PATH_URL>"
We validate that the hospitals and medics exists, besides the webhook has allowed POST requests.
Then whenever a prescription is made from that list of users, we sent to your webhook the follow information
{
    signature: "<SIGNATURE_ID>"
}
So you can hit the prescription detail view or do whatever your bussiness logic need
Management Memberships
Below we can see the main use cases to start using the membership endpoints.
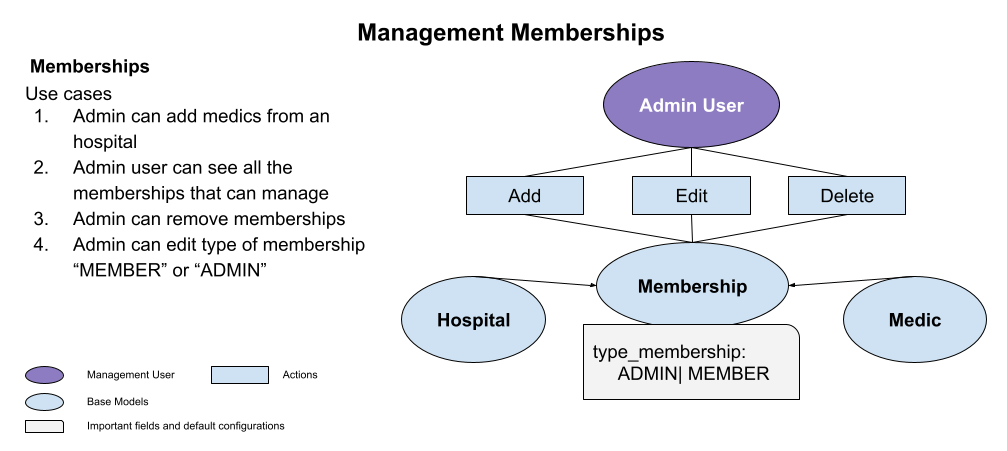
Let's see the Prescrypto API endpoints about to manage the memberships.
See list of memberships that admin user can manage
As you can see in the above diagram, the membership is the model object that act as union between medic and hospital, you can register new medics to a hospital creating a membership, revoke permisions making a "DELETE" request or modify between "MEMBER" or "ADMIN" type of membership.
curl --request GET \
  --url <BASE>/api/v2/management/memberships/ \
  --header 'Authorization: Token <ADMIN_TOKEN>' \
  --header 'Content-Type: application/json' \
Response
{
  "count": 2, // Number of memberships found
  "next": null,
  "previous": null,
  "results": [
    {
      "id": 1,
      "medic": {
        "id": 1,
        "email": "test.1@email.com",
        "name": "Medic TEST 01"
      },
      "hospital": <HOSPITAL_ID_01>,
      "type_membership": "ADMIN",
      "is_active": true,
      "is_deleted": false,
      "date_joined": "2019-06-21T17:00:09.472000Z"
    },
    {
      "id": <MEMBERSHIP_ID>,
      "medic": {
        "id": <MEDIC_ID>,
        "email": "<MEDIC_EMAIL>",
        "name": "<MEDIC_NAME>"
      },
      "hospital": <HOSPITAL_ID_02>,
      "type_membership": "<MEMBER_OR_ADMIN>",
      "is_active": true,   // Means the hospital is the currect active hospital with the user
      "is_deleted": false, // whether the user can use the location or not
      "date_joined": "2019-06-21T17:00:21.424000Z"
    }
}
TIP: Don't forget the MEMBERSHIP_ID , MEDIC_ID, HOSPITAL_ID these are the most important fields in this section
See list of memberships from one hospital
Other use of case is when a medic admin only wants to see the memberships by hospital. Let's see one example.
curl --request GET \
  --url <BASE>/api/v2/memberships/<HOSPITAL_ID>/ \
  --header 'Authorization: Token <TOKEN>' \
  --header 'Content-Type: application/json' \
Response
 [
    {
      "id": <MEMBERSHIP_ID>,
      "medic": {
        "id": <MEDIC_ID>,
        "email": "<MEDIC_EMAIL>",
        "name": "<MEDIC_NAME>"
      },
      "hospital": <HOSPITAL_ID>,
      "type_membership": "<MEMBER_OR_ADMIN>",
      "is_active": true,   // Means the hospital is the currect active hospital with the user
      "is_deleted": false, // whether the user can use the location or not
      "date_joined": "2019-06-21T17:00:21.424000Z"
    }
]
For example you can see this list when enter to edit a hospital, a hit to the hospital and other for the list of memberships inside are requested.
Search a medic to use the medic id
For almost all interaction with memberships, looking for a medic id could be tedious. For that reason, the endpoint search medic could be useful, let's see the example:
Request
curl --request GET \
  --url '<BASE>/api/v2/search/medics/?query=<EMAIL>' \
  --header 'Authorization: Token  <TOKEN>' \
  --header 'Content-Type: application/json' \
Response
{
  "count": 1,
  "next": null,
  "previous": null,
  "results": [
    {
      "id": 25,
      "email": "<EMAIL>"
    }
  ]
}
Note that the response could be 200 okay but not founded any match, the response will be as follow:
{
  "count": 0,
  "next": null,
  "previous": null,
  "results": []
}
Create a membership
As part of the flow, creating memberships will require at least the medic id, hospital id, and what type of membership.
The is_active field will require a specific endpoint to update it. Please see the next section "Set as default hospital"
Create membership request example:
{
  "hospital": <HOSPITAL_ID>,
  "type_membership": "<ADMIN or MEMBER>",
  "medic": <MEDIC_ID>
}
Response
# status 201 created

{
  "medic": <MEDIC_ID>,
  "type_membership": "<ADMIN or MEMBER>"
}
Although chances are that the medic has already a membership on the hospital selected.
We catch that flow and still return the 201 created, but reactivating the membership with the field is_deleted=false
Only your management hospitals are allowed to create new memberships
Set as default hospital
Creating more than one memberships for a medic means that the medic has to select what location is the current or active hospital, using the following endpoint is the best aproach, othwerwise, you must change all the medic memberships is_active=false and the active membership change it to is_active=true. This endpoint made that, let's see the example:
curl --request PATCH \
  --url <BASE>/api/v2/locations/update/ \
  --header 'Authorization: Token <MEDIC_TOKEN> ' \
  --header 'Content-Type: application/json' \
  --data '{
  "hospital_id": <HOSPITAL_ID>
}'
Response
# status code 200
{
  "message": "HOSPITAL UPDATE SUCCESSFULLY"
}
If the medic has not membership on that hospital a 404 status code will be the response
# status code 404
{
  "message": "HOSPITAL UPDATE SUCCESSFULLY"
}
Modify memberships
The important fields to change are, type_of_membership, medic or hospital.
So you have to store these values before proceed to change the membership, also the <MEMBERSHIP_ID>
Only your management memberships are allowed to modify , Let's see an example:
Request
curl --request PATCH \
  --url <BASE>/api/v2/management/memberships/<MEMBERSHIP_ID>/ \
  --header 'Authorization: Token <ADMIN_TOKEN>' \
  --header 'Content-Type: application/json' \
  --data '{
      "type_membership": "MEMBER"
}'
Response 200 OK
{
  "id": <MEMBERSHIP_ID>,
  "medic": {
    "id": <MEDIC_ID>,
    "name": "<MEDIC_NAME",
    "email": "<MEDIC_EMAIL>"
  },
  "hospital": <HOSPITAL_ID>,
  "type_membership": "MEMBER",
  "is_active": false,
  "is_deleted": false,
  "date_joined": "2021-07-21T21:43:41.315975Z"
}
Delete or remove memberships
There is a way to elimitate a membership, using this endpoint but this will be as a soft delete. That means that the "is_deleted" field will be set to true. Let's see the example
Request
curl --request DELETE \
  --url <BASE>/api/v2/management/memberships/<MEMBERSHIP_ID>/ \
  --header 'Authorization: Token <ADMIN_TOKEN>' \
  --header 'Content-Type: application/json'
Response HTTP_204_NO_CONTENT
Notice that the response is empty, but the status code is 204
[EOF]